 *** UPDATE: This post is extremely old and out of date and requires revision. ***
Depending on your browser, its settings, and how often you visit our site, you may have noticed a change. The picture of two hearts in the upper left corner of the web site address appears when at TobyLaura.com. It is a small version of the one at the top of this blog. On this page, it’s a picture of yours truly. We added these bookmark pictures to make our site more personal and stand out. Also, if our homepage is bookmarked, it should also show up in your list of bookmarks.
It is called a Favicon and its file extension is .ico and here are some examples (just look at the image next to the ‘http’ part of the address in the address window.)
TobyLaura.com
Scattershooting
GreenExamPrep
They are fun to add and if you have a personal page or Google blog, they add a nice touch. You’ll notice that most companies have one, and large websites use them to attract attention, so why not add one yourself? Read on to learn how to do it. It can seem a little daunting at first, but take a deep breath, you can do it! If you need to, keep this window up, as well as the window you are using to make your adjustments, so you can easily get back to this page if you need help. Let’s get going.
First of all, you need a picture or drawing. If you know an animator, they can draw you a logo or some simple file like a flower, that will look good in such a small size. You’ll notice that the Favicons are very small, so a detailed logo or family group photo will not work. Something with just a few colors or a cropped photo of a face work well, like in my example links above.
Once you choose a picture, logo, or drawing, then upload it to this site here. It will format the image into an .ico file for you automatically, and then let you preview what it will look like in someone’s browser. Then, simply click the download button to put the .ico file on your hard drive.
Adding the favicon to your website or blog depends on how you host your site or blog. Google blogs and pages, iWeb for Mac, and standard sites where pages are published to a host via FTP are the most common ways to have something on the web.
If you publish to a host via FTP, you have it made in the shade. Just upload the picture saved in .ico format into your public directory and it will show up on each page of your website. It knows that a favicon file is the file for the address image, and you are finished.
Below, I’ll talk about how to add it to a Google page/blog and iWeb.
Google Blogs
Your favicon picture (formated into the .ico format as explained above) needs to be hosted, or viewable on the internet somewhere. Google can host an image through Pages, which comes with Google Apps. There are lots of image hosting options on the internet, but the image needs to have a unique web address that points directly to the picture. For example, you may put photos up on Google’s Picasaweb, but the picture won’t have a unique web url address. Google Pages will allow a unique web address for the image, like: http://www.tobycline.com/favicon.ico This picture loads in a page all by itself and is what you will need for this to work. Another quick and easy way to “host” a picture with its own direct web address is to post a picture into a blog entry.

Click on the picture of Elliot falling off the bicycle (funny!) and you’ll have a picture on its own web page and it’s web address in the url window, ready for you to copy.
Once your picture is online, where it can be seen on the internet, it is time to get it to appear where you want it. If you put your picture on the internet through the free Picasa option, click on the picture, and note its web address, or link. Then log into your Google blog and select: Customize>Layout>Edit HTML. You will see a window with all the html garble-di-gook that is your blog, in raw form. Find the code right at the top, that should look like this:
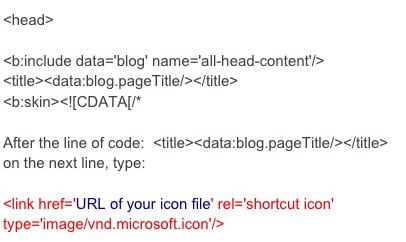
Make sure not to simply copy this exactly, but actually put your picture’s URL in, instead of the words ‘URL of your icon.’
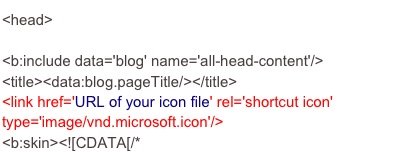
The whole thing will look like this:
Click to save your new template and you should see the new icon (favicon) next to your address!
For Google Pages
Java script is used if you use Google to make your website with Google Pages. Open your Google Pages editor and on each page you want your favicon to show up in, click on either the header or footer, and click “edit html.”
Then paste this code into the html page:
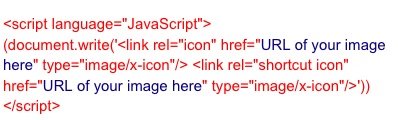
Obviously, change the “URL of your image” to the actual url where your image is. For example, my url is: http://www.tobylaura.com/myicon.ico
Each page you create, simply paste this into the header or footer and you are all set.
Add a favicon to iWeb
Using iWeb can be a blessing and a curse. It is easy because all the html is hidden behind the scenes. However, when you want to knowingly manipulate the html code, it can be tricky. You kind of have to trick Apple’s iWeb to get it to do what you want it to — and Apple won’t tell you how to do this kind of stuff. Bummer.
Upload your picture to this web site here. It will convert it to a favicon format. Now, download it to your desktop. Then, save the favicon.ico file in your iDisk folder. It needs to be saved in your root directory. So make sure you select: iDisk>Web>Sites. Drop it in that folder, where you will also see a folder with your website’s name. (Hint: anything you put in this folder will show up as: YourURL/file So my icon in that folder would have an address of: http://www.tobylaura.com/myicon.ico. It is your root directory.)
Now, for every page you want your favicon to show up in, you need to paste some code into your page’s html code. How do you do that? Open TextEdit or some other simple text processor like Notepad. DO NOT use a word processor as it can add extra spaces and characters that may mess up your code.
For this example, we’ll assume you are going to change the home page: Home.html. In your files, you could have named this something else. So, in general, open any page that you have created by finding the page name followed by the .html extension.
In TextEdit open: iDisk>Web>Sites>yourwebsite folder>home.html. Important: Check the option to ‘ignore rich text commands’ because if you don’t, this won’t work. Ignoring rich text commands allows you to see the html code of the page. This check box is near the Open and Cancel buttons on the dialogue box that appeared when you selected Open. If you forgot to check the “ignore rich text commands” button, you’ll see your page like it looks on the web. If you correctly selected the button, you’ll see a bunch of html code; how your computer sees your webpage. Now you are looking at the html code like you would in the EditHTML page in Blogger.
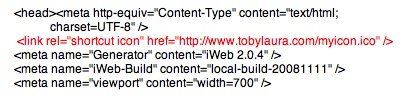
Find the top of the page where the code starts out with the head and meta name, near the top of the page:

Then, paste this code into your page in the space above the meta name code:
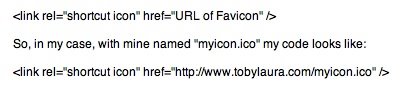
Here is a text selectable version so that you can copy and paste it easily and properly. Just remember to change your URL inside the quotation marks to your specific web address.
So all together, it looks like this:
Click ‘Save.’ Do this on every page you want your favicon to appear, and also every time you publish a new page. Each time you publish a page because of changes you made to it, this code you’ve entered will be deleted by iWeb. So, after each publish, reopen your iDisk and put this code back into the pages that you made changes to. This code will remain on all of your pages where no edits were made, but all the pages iWeb “Publishes” also deletes any code you’ve placed on those pages. If it gets to be a pain, I recommend just putting it on your home page, and then not making any changes to your home page, but do as much as you feel like you want to.
Good luck — and let me know if you have any questions.